
Hi, I'm Launch!
I am a Fortnite Festival streamer and have been playing rhythm games for 20+ years!
#EpicPartner | CRKD | RetroCultMods
Use code LAUNCHABLES
Let's Calibrate!
Yes, this guide has been updated for the new system!
Introduction
Are you struggling with hitting perfects (or even hitting notes consistently) in Fortnite Festival?
It sounds like you need to calibrate your game.What calibration does is that it matches up the audio and video of your game and hardware so that they're both in sync, making it to where pressing your button on a note is actually accurate to the song.So that being said, Let's Calibrate!
NOTE: THIS METHOD MAY NOT WORK FOR EVERY SYSTEM SETUP. IF IT DOESN'T WORK FOR YOU, TRY OBVI.BRI'S METHOD OF CALIBRATION

Hit notes like me!
Prerequisites
You will need a few things to get started:
A smart phone that supports 60 FPS video recording
A video editing software (you only need one of them)
Free options
Adobe Premiere Rush (mobile)
DaVinci Resolve (Windows/Mac)
Other options are available, but you are on your own if you decide to use something other than the ones above! Sorry!
Access to one of the following songs:
Built Together
Hail to the King
Idol
Killing in the Name
Lean Back
March of the Pigs
Master of Puppets
Please Please Please
Ride the Lightning
Short Skirt/Long Jacket
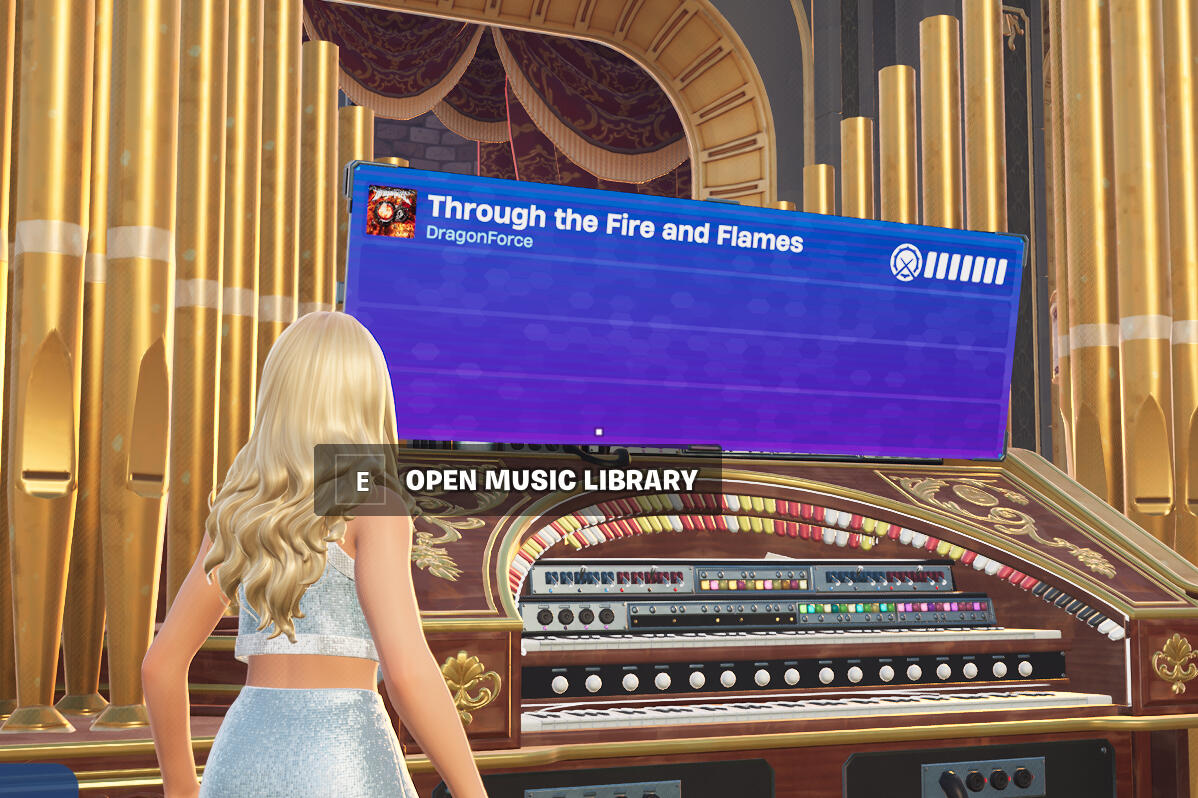
Through the Fire and Flames - Drums (Recommended)
NOTE: Calibrate with the indicated instrument. We're working on getting the full list of instruments for this. For now, use TTFAF.

Programs that work well for this kind of calibration.
Getting Started
To get started, you must do the following:
Set your phone's camera to record video at 60 FPS
Turn off "Auto FPS", if applicable
Click below for your respective device type:
Preparing Fortnite
Now that our phone camera is prepared for recording, let's setup your game hardware and Fortnite for the recording process.
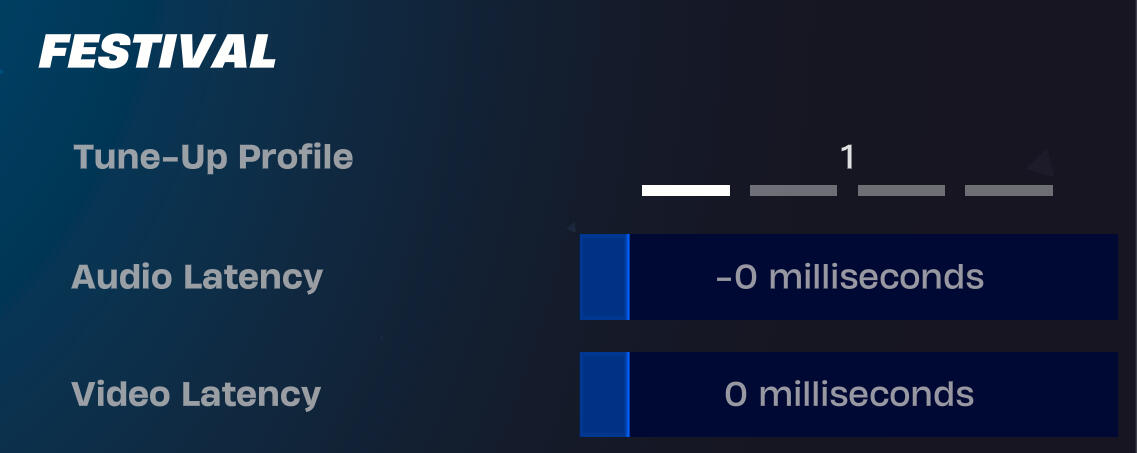
Set your in-game settings as:
Audio Latency: 0 milliseconds
Video Latency: 0 milliseconds
The Little Details for PC
If you are playing on PC, we highly suggest adjusting your settings to where you are at least getting the max performance out of your monitor when playing.60hz @ 60fps, 120hz @ 120 FPS, 165hz @ 165FPS and so on.

Your in-game settings should look like this!
Recording
Once both the phone and Fortnite are prepared for calibration, we can start recording!
Load into Festival Main Stage.
Open game settings and make sure that both Audio Latency and Video Latency are set to 0.
Make sure that the audio device you're recording is the one you'll be playing with. You may have to increase your volume for a better calibration process
If you use speakers to play, record from the distance you normally play at
Pick a song you own from the list in the Prerequisites step.
Double check your phone settings and prepare to record.
Ready up to start the song.
Record the first few notes WITHOUT playing them. Just let the notes pass.
You now have a video prepped for calibration! You can compare yours to this example video to see if yours is correct.
Check your latencies!

Load up a song from the prerequisites list!
Calibration
Now that we have the video in hand, we can now load it into a video editing program and measure the latency.
If you are using the DaVinci Resolve method, you will have to transfer the video file to your computer. You can upload it to Google Drive or a file sharing site like /tmp/files.
Applying the Math
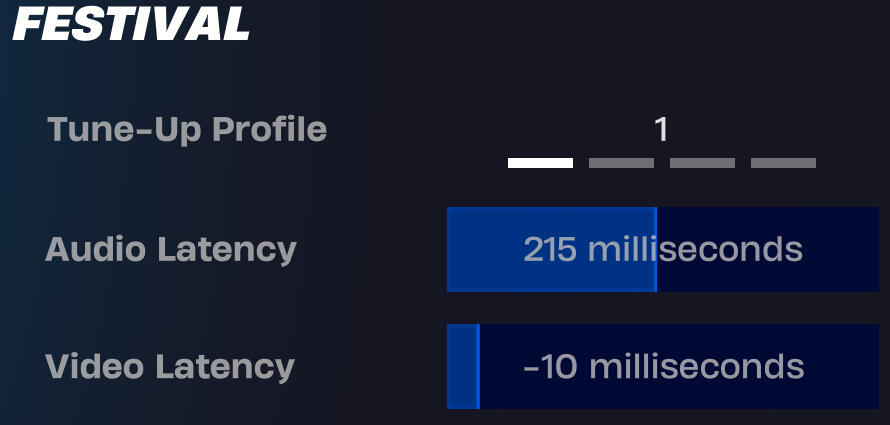
Through the frame counting we did using the video editing software in the previous section, you can now apply that number to your game! If you didn't multiply the number yet, it's [the frame count from your video] x 16.66667, then round to the nearest 5.In our example case, it ended up being approximately 215 milliseconds.Now, apply this Audio Latency ONLY.
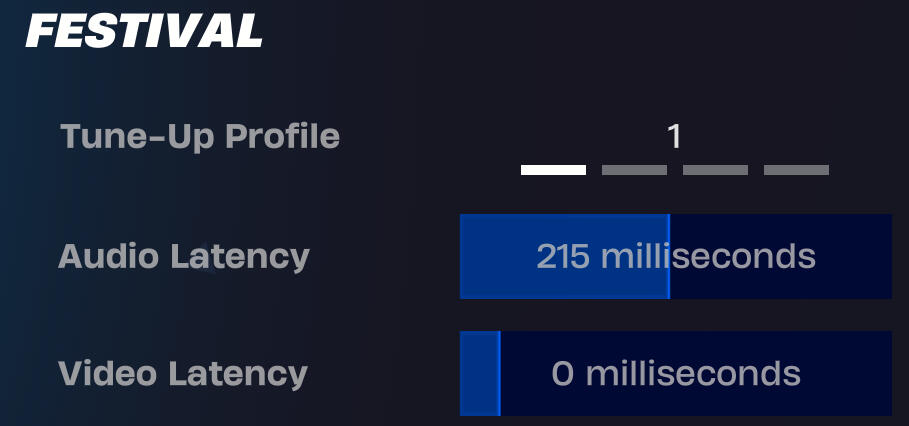
Plug in the number you got through the multiplication!
Play to Refine
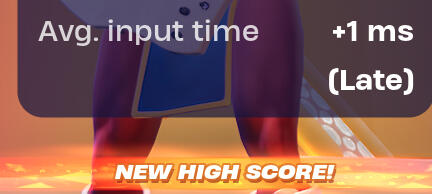
Now, we have to figure out what our Video Latency is. The number generally should not go beyond +/- 50.How do we refine? We have to play some songs! Play songs that are between 1-3 difficulty that do not have many lift notes. You want to play as accurately as possible. Lift notes tend to be more difficult to play accurately, so avoid tracks with those.You will want to play at least three songs. At the end of each one, write down the "Avg. input time" that is displayed in the More Details menu.We suggest playing these tunes:
Woman by Doja Cat on Lead
Therefore I Am - Billie Eilish on Lead
Lovin On Me - Jack Harlow on Lead
(Most of the Billie Eilish songs on Lead tend to be good choices for the refinement process)
Preferences
Your track speed can impact your Video Latency, so play only on the track speed you are most comfortable with.And no, a higher track speed does not represent higher skill.
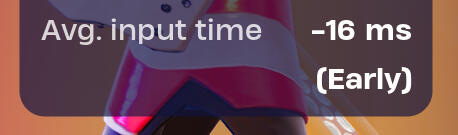
Your input time will usually look far off from 0.
Average the Numbers
After playing through a few songs, we now have a list of "Avg. input time(s)".We played five in our refinement.
The results were:
9ms EARLY
10ms EARLY
30ms EARLY
2ms LATE
11ms EARLY
We have two outliers, the 30ms EARLY and 2ms LATE. Let's ignore those and look at the other ones. If we average them, it ends up being 10.So since the input times said EARLY, we must lower the Video Latency by 10ms.
Increase or Decrease?
When the "Avg. input time" says late, you must INCREASE the Video Latency.If the "Avg. input time" says early, you must DECREASE the Video Latency.
We lowered the Video Latency by 10, since that was our average EARLY latency!
Final Notes
You now have your near-optimal latency! However, let's set some expectations. Due to the nature of how calibration is in Fortnite and that performance is variable in both the device you're playing on and your own play ability, we will expect this:
You will not always have a low number in the post-song details. Our range of what is deemed acceptable is +/- 5.
If you are consistently receiving the same calibration (such as +5 EARLY), you can adjust your Video Latency accordingly to match your play better.
This is not permanent. Every update that Epic pushes live affects the calibration of Fortnite Festival. Why? We have no idea.
We want it to be within +/- 5.
Got any questions?
Contact me via my Discord server!
Join here:
Spare change?
If you would like to leave me a tip, you can send me one here:
Let's Calibrate!
iPhone Camera Setup
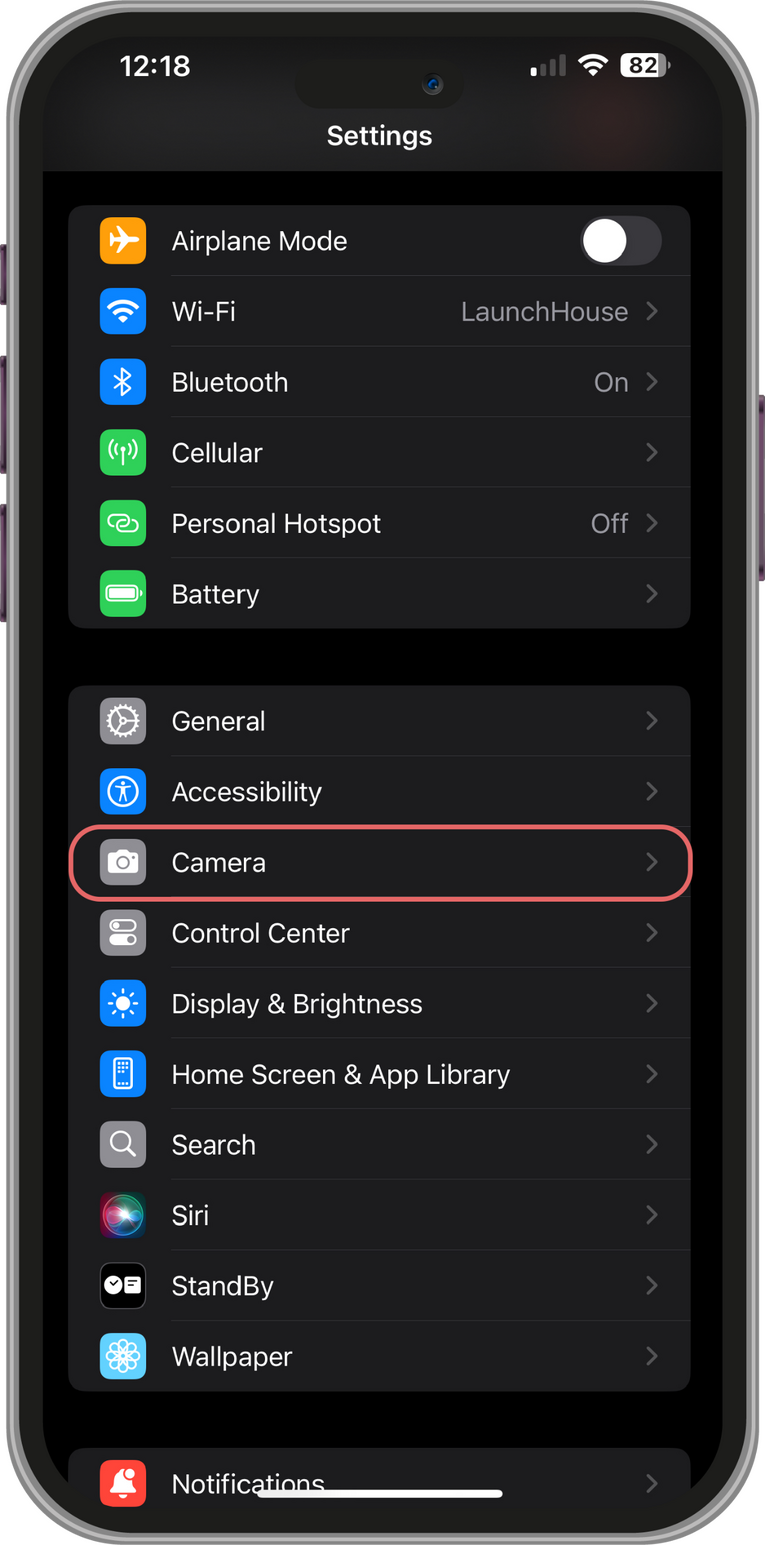
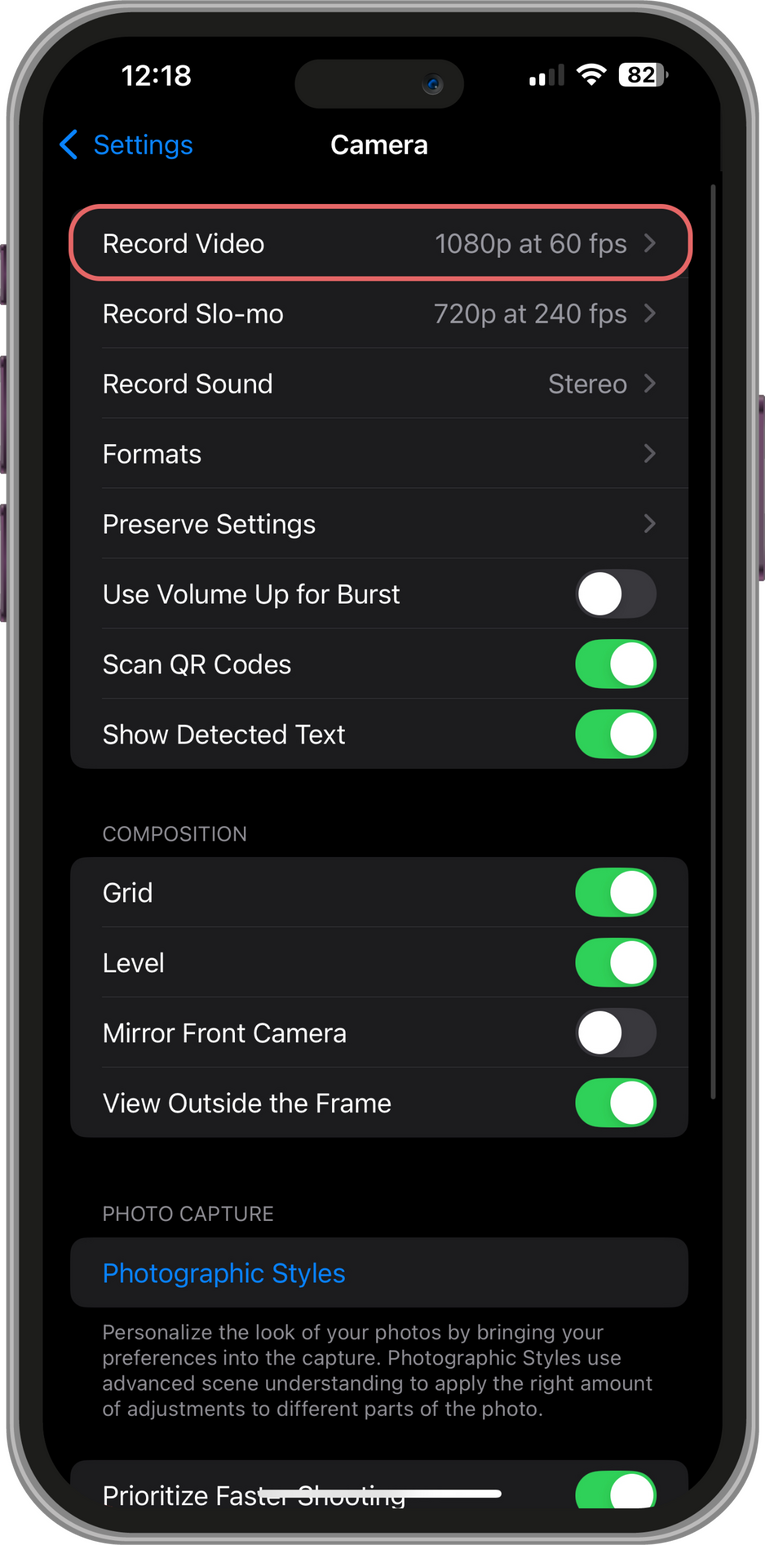
Getting to the iOS Camera Settings
This may look different for you, as different version of iOS have different placements of where the Camera settings are.
Adjusting Video Recording Settings
Now, tap on the "Record Video" section. Yours may have a different setting, like '720p at 30 fps' or '4K at 24 fps".
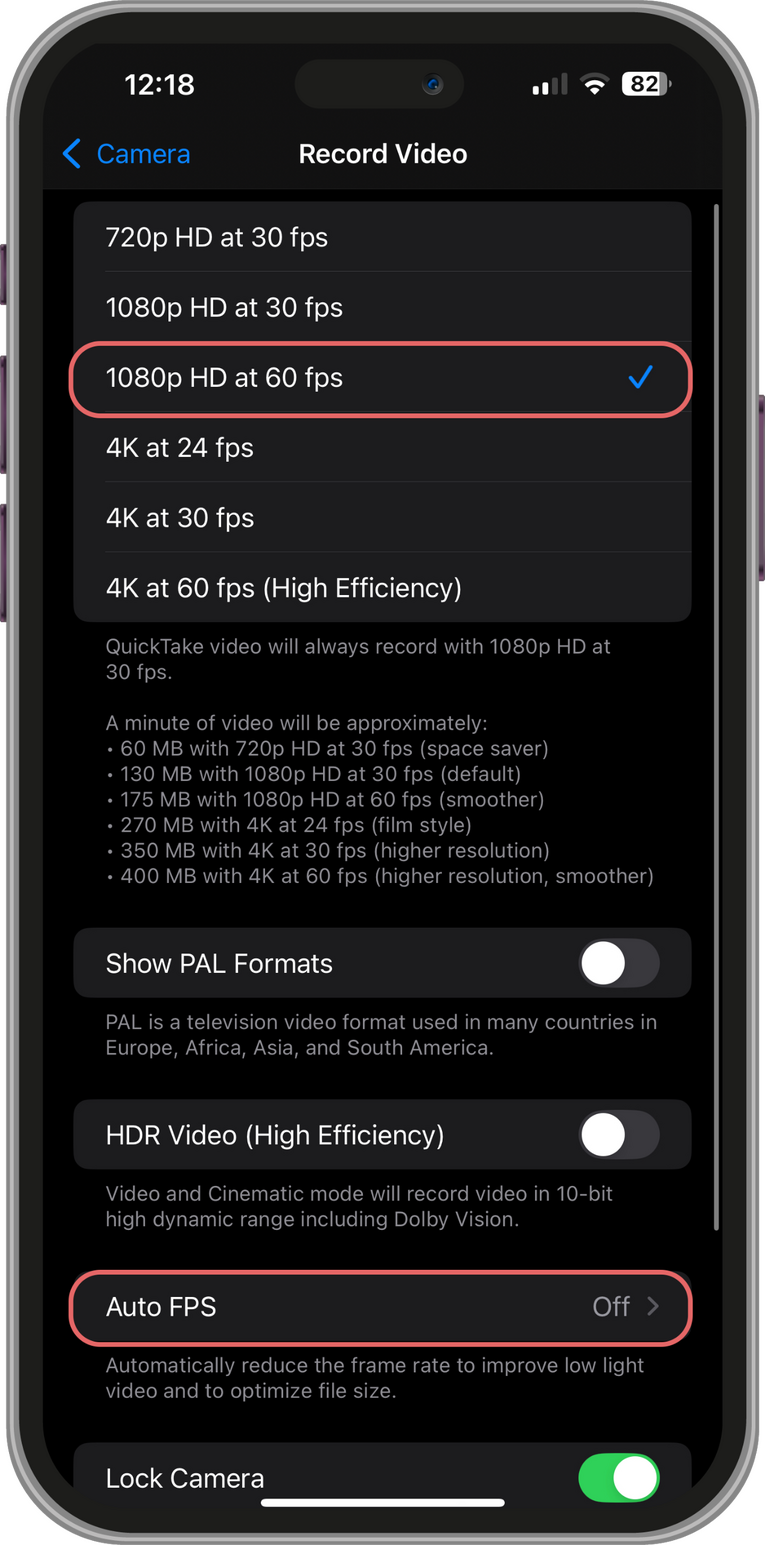
Make the Changes
Change the main video recording setting to '1080p HD at 60FPS'.After, scroll down and tap on "Auto FPS" and then turn it off.The most important part about this is that we now have forced 60 FPS, which we need for more precise calibration.Now, you can return to the guide!
Let's Calibrate!
Android Camera Setup
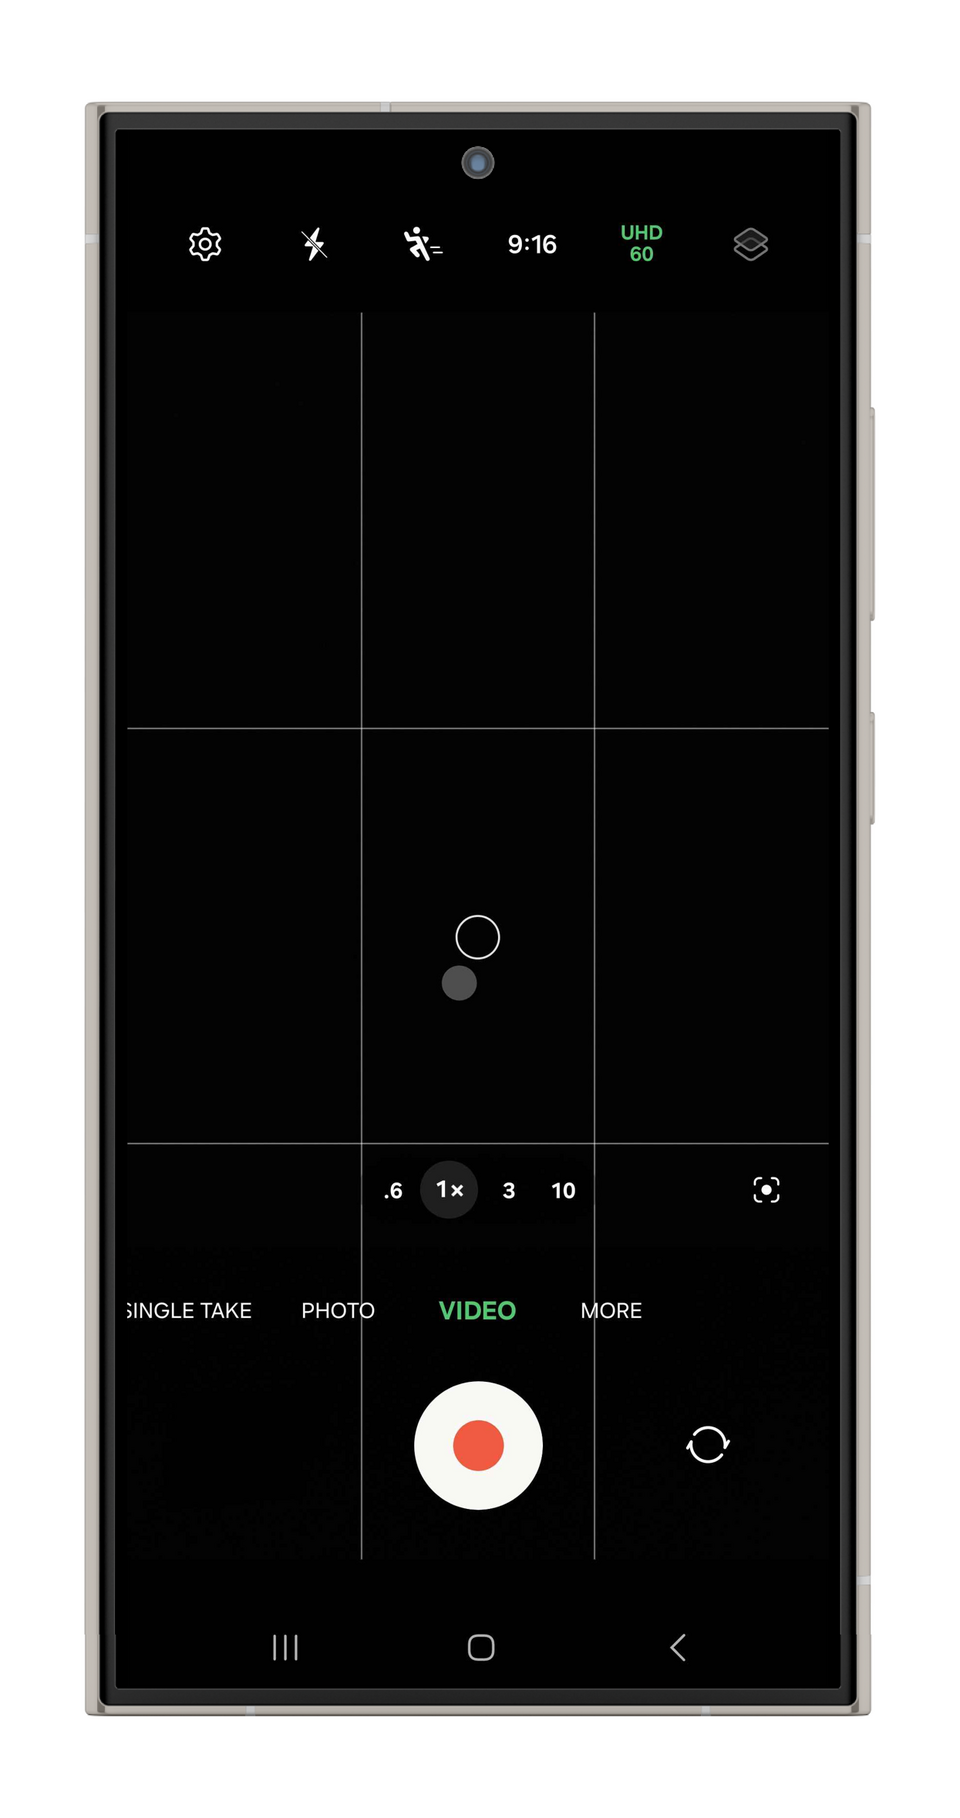
Getting to the Android Camera Settings
This may look different for you, as different versions of Android OS have different interfaces for the Camera app.This example is from a Samsung Galaxy.Tap the button at the top right that indicates the resolution. In this case, it says UHD/60 which is 4k/60 FPS.Don't record in 4K. It just takes up more space in this situation.
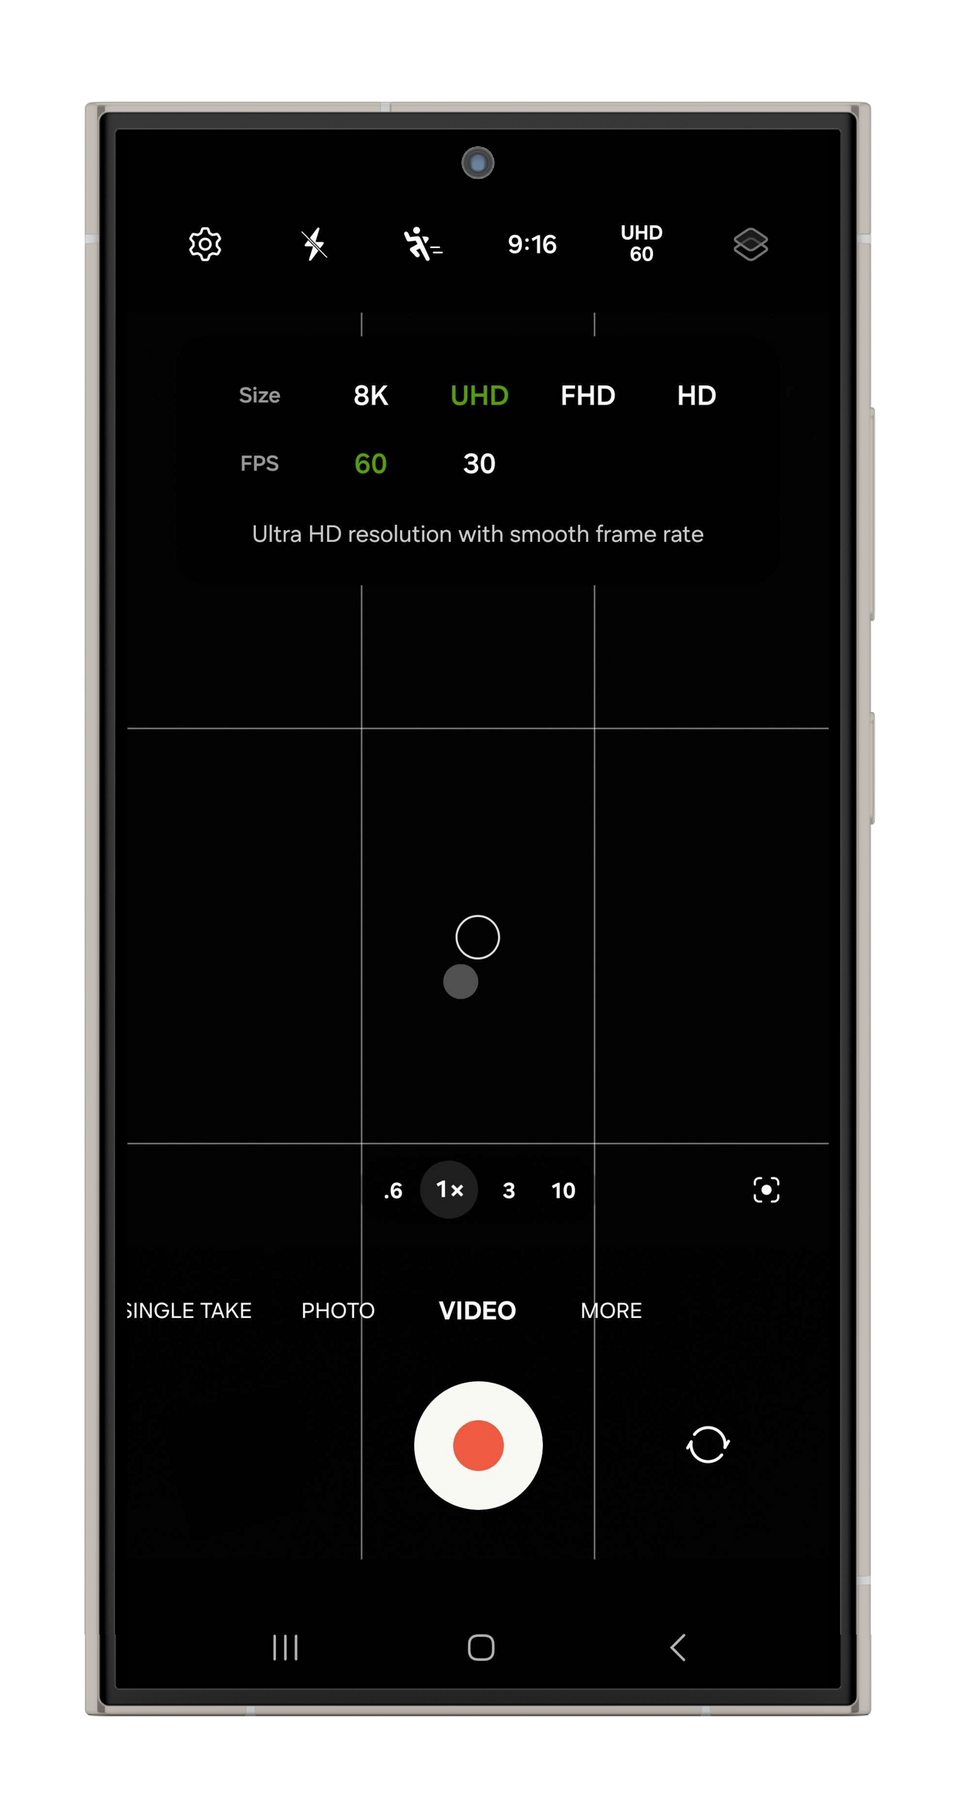
Make the Changes
You will want to change the size setting to either FHD (1080p) or HD (720p). Smaller resolution means smaller file size!Then, set your FPS to 60.The most important part about this is that we now have forced 60 FPS, which we need for more precise calibration.Now, you can return to the guide!
Let's Calibrate!
Adobe Premiere Rush Frame Calculation

Create a Project
Select the “+” which will open the “Create New Project” menu.From there, you will select the “Add Media” option. Then, you will choose your clip from your camera roll.

Create a new project!

Your Video is in the Project!
Once you are in the project canvas, you should be able to see a preview of your clip along with a video timeline and audio soundwave!

This is the project timeline. Tools at the bottom.

Audio Preparation
Double click the video timeline - this will display the “Separate Audio” option, which you will need to do.Next, you will want to increase the clip audio volume. From the menu bar at the bottom of the screen, select the “Audio” option, then click on the “Clip Volume” button.Raise the volume all the way up to 100. These steps make it easier to find the “peak” of the soundwave.

Press "Separate Audio"

Now, you can see the waveforms!


Stretch the Timeline
From the video timeline, you will want to zoom in to expand the soundwaves and scroll until you're right next to the peak of the first bit of audio. I go about a frame or two after the initial peak.

Stretch with two fingers!

Count the Frames
Using the “◄▌” button, you will tap back and count each “frame” until the the note in your clip preview lines up with the strikeline.You will take the amount of frames and multiply that number by 16.67. If needed, you can round it up or down to the nearest multiple of 5.In this example, we found that it took 13 frames, meaning that our latency would be 216.71, which we'll round down to 215 milliseconds.This is what you will set your Audio Latency to in the game!

Count the frames until the note is on the strikeline!

Let's Calibrate!
DaVinci Resolve Frame Calculation
Open the Application
Now that you have obtained your clip from the previous steps, you will open DaVinci Resolve.If you haven't already downloaded the program, you can get it here:
Download the app!
Create a Project
Once you open DaVinci Resolve, this menu will open every time you start the program. On the bottom right, there is a "New Project" button. Press that to get started!

Create a new project!

Add Your Video
to the Project
Once a new project has been made, we have to add our video to the program. Using File Explorer (Windows) or Finder (Mac), drag the video onto the Media PoolYou'll know this has worked once you see a file in the "Media Pool" box with a thumbnail of the video.

This is the project timeline. Tools at the bottom.

Switch to the Edit tab
While this process can technically be done from the "Cut" tab, the "Edit" tab will make it easier for us to see the fine details of the video.Click the "Edit" button at the bottom of the screen.

Press "Separate Audio"

Drag the Video Onto the Timeline
After getting into the "Edit" section, you'll see that there is nothing in the video timeline. From the "Media Pool" on the left side of the screen, you can drag your video onto the timeline.

The green bar is the audio!

Stretch the Timeline
We are going to need to see the fine details of the clip, particularly with the waveform of the audio, so we must stretch the timeline! Click and drag the zoom in the toolbar.

Drag that circle to the far right!

Increase Audio Levels
Hover on the green bar until your cursor turns into two arrows that point up and down. Once it turns into that, click and drag upwards so that the volume increases.We want it to be as clear as possible to see where the beeps are.

Click and drag the volume up!

Count the Frames
Once your timeline is setup, put the orange video cursor a little past the peak of a beep.Once you're about where the center of the beep is, press the left arrow key on your keyboard until you can see the squares line up with the rectangle. Count how many times you have to press the key. This is the amount of frames you must calculate with.You will then take that amount of frames and multiply that number by 16.67. If needed, you can round it up or down to the nearest multiple of 5.In this example, we found that it took 13 frames, meaning that our latency would be 216.71, which we'll round down to 215 milliseconds.This is what you will set your Audio Latency to in the game.

Count the frames until the notes are on the strikeline!

Let's Calibrate!
Program Downloads

Programs you can calibrate with!
Launch's Product Reviews


Gibson Les Paul
Blueberry Burst Pro Edition
CRKD
Launch's Product Reviews
CRKD's NEO S Fortnite Festival Edition


A Little History Lesson
Seventeen years ago, development studio Vicarious Visions, under Activision, released Guitar Hero: On Tour for the Nintendo DS. With that release came the 4-fret attachment, a necessary plug-in button grip used to play the game. This attachment was produced by RedOctane. Alongside the 4-fret attachment was the stylus guitar pick, which allowed players to ‘strum’ by swiping on the touch screen in time with the notes.RedOctane, known for their Guitar Hero controllers, had previously ventured into the feet-based rhythm game scene. In the early 2000s, the company’s founders, brothers Kai Huang and Charles Huang, founded a video game rental service called WebGameZone. This company imported early versions of Dance Dance Revolution for the PlayStation 2, along with other popular Japanese-exclusive games, to the United States.Although WebGameZone imported DDR to the US, it did not import the necessary accessories to play the game—specifically, the dance pads. So, under the name RedOctane, the Ignition Dance Pad was introduced. To be clear, RedOctane also produced other video game accessories and peripherals, such as fightsticks and Taiko drum pads, alongside the Ignition pad. Needless to say, RedOctane was well versed in game peripherals.Unfortunately, RedOctane went defunct in 2010 after being acquired by Activision in 2006.
A Return to a Familiar Grip
Seventeen years later, the RedOctane team has come back as CRKD to release a successor to the 4-fret attachment…The NEO S Fortnite Festival Edition!The Fortnite Festival Edition is a customized NEO S controller with the new 5-fret Guitar Grip Attachment. While the NEO S is a pre-existing controller produced by CRKD, they have designed all NEO S controllers to be compatible with future attachments. In this case, it's the 5-fret Guitar Grip!
*FOR CLARITY, CRKD SENT THE NEO S FORTNITE FESTIVAL EDITION TO ME FOR FREE FOR CONTENT CREATOR COLLABORATION & REVIEW


So... What's in the Box?
NEO S Controller (With 5-fret Guitar Grip attachment pre-installed)
Black ‘hook-and-loop’ fastener strap
3ft USB-C to USB-A cable
Black NEO S - CRKD microfiber pouch
Quick Start instructions
Let's Get Technical
Here are some technical specs of the device before we get to the review portion... If you don't care to know the details, click here to skip this section.
NEO S
Weight
Controller, no attachment or strap: 190.9g
With attachment, no strap: 215.3g
With attachment & strap: 220.6g
Wireless connectivity through Bluetooth 5.0
2.4GHz ISM Radio band
USB C
Charges internal lithium-ion battery
Transfers data & power simultaneously, “Play & Charge”
Very little latency when wired to Switch/PC!
3.5mm TRRS headset jack
Buttons/Thumbsticks
Hall Effect thumbsticks with clicky microswitch L3/R3
Hall Effect triggers
Clicky microswitch bumper buttons and rear paddles
Rubber Dome/Membrane face buttons, including D-Pad
Reset and “PROG” button on the back
Proprietary attachment pogo-pin connector pads at the bottom
RGB LED in the CRKD logo button that changes colors depending on the mode
NFC chip in the back of the controller for setting up in CRKD App
5-fret Guitar Grip Attachment
Rubber Dome/Membrane buttons with lighter actuation threshold than face buttons
Pogo-pin metal connectors, similar to the ones used in the RedOctane Les Paul guitar controller for Guitar Hero 3 / Aerosmith
Diffused RGB LED that changes colors depending on the mode


Opinions Opinions Opinions
Packaging and Pre-play Impressions
Upon receiving the NEO S, I was impressed by how flashy and stylish the packaging is. Major props to the designer for the excellent attention to detail. Opening it up, I was presented with the controller in the microfiber pouch. The pouch has enough space for the controller + attachment, the strap, and the included USB cable. I found that it was as simple as bringing the whole pouch in my bookbag when I wanted to play on the go, which I actually got to do once…, but we’re getting way ahead of ourselves.

The CRKD App and it's Quirks
With the controller comes with the CRKD app. Setting up an account and getting started was easy enough using NFC with the controller and my smartphone. However, there is one feature that I was, and still am, heavily against: recorded ‘rarity reveal’ videos that use your front-facing camera. Although the app asked for permission to use my camera and microphone, I never expected it to record a video of me ‘reacting’ while revealing the product number and rarity.I personally am not a fan of giving things artificial value. Receiving this feature as a first impression was an unpleasant experience. Aside from that, the app is a pretty solid controller configurator that covers everything you would want out of an app designed around game peripherals.

Face Button Configuration

Back Paddle Configuration

Fret Mode and Configuration

Hall Effect Trigger Sensitivity Setting

Hall Effect Thumbstick Settings

Vibration Motor Settings


Gamer Time
Now that we’ve set up the controller, let’s get playing! I played with the NEO S using my PC.My PC experience was multifaceted. On one hand, the NEO S is an absolutely spectacular controller to play games with, especially ones where I use the NEO S as a regular gamepad… wired. We’ll come back to that. The controller felt very responsive and the sensitivity was perfect in the thumbsticks and triggers. On the other hand, the NEO S struggles to be a controller that I first think of using when wanting to play games.I played the following non-rhythm games:
Tekken 8
My experience with Tekken was alright, although it really felt like I was just using any other controller, as I really only used the rubber dome/membrane parts of the controller. My only issue was that due to using the D-pad, there was very little space for gripping the controller with my left hand. The ergonomics aren’t there for fighting games, but are definitely still playable.
When using standard controller grip, I found that the RB button being closer to the face buttons was useful for multi button binds and that using one of the paddles on the back was great for Rage Art activation.
When I played using an overhand/”fightstick” grip with my right hand, I found that the right paddle was great for multi button binds.

Stardew Valley
For a casual game like Stardew Valley, a controller like this is perfect. Small and comfortable to use in standard controller grip with silky smooth thumbstick movement had me losing track of time while playing with the NEO S. I could see using the controller to play casual games on the Nintendo Switch being a pleasant experience.

Fortnite - Battle Royale: Zero Build
Playing Battle Royale, particularly Zero Build, I had only an ‘okay’ time playing with the NEO S. With the ability to rebind buttons to the back paddles, it made certain movements like quick sliding easy. The hall effect thumbsticks allowed for me to have very smooth tracking and have precise micro adjustments while sniping, but that’s really all the positives I had with using the NEO S to play Fortnite BR.
I found that the shape of the controller caused me to have to reposition my hands frequently and playing for extended amounts of time became tiring. I personally find that the symmetrical thumbsticks of a Playstation controller are much more comfortable than the asymmetrical style that the NEO S uses.

Hades
Hades was a surprisingly good experience on the NEO S. Something about the gameplay of Hades made it work well. Perhaps the more frequent use of the face buttons rather than triggers made it feel better to play with.The short-ish sessions of Hades allowed for the perfect amount of intense play with the NEO S.

For rhythm games, I played Fortnite Festival only, as I figured the experience would be similar all around.
Fortnite Festival Pad Mode (No 5-fret Guitar Grip Attachment)
Playing pad mode with the NEO S was okay. The closeness of the face buttons allowed for faster lane swaps, but also caused fat fingering. The curvature of the D-pad allowed for smoother transitions between lane 1 and lane 2, which was a definite positive. Other than that, it was just business as usual.
This is not pictured, as it is the same as playing on other controllers.
Fortnite Festival Pad Mode (With 5-fret Guitar Grip Attachment)
Now this usage of the NEO S is where things get interesting. The 5-fret Guitar Grip Attachment has you flipping the controller and strapping it to your hand to play. It was okay, until I got to songs that had intense trills and rapid pressing of a single fret. For Latveria? OUCH. Ride the Lightning? OOUUUUUCCCCHHHH. Aside from that, it played just like how playing pad charts with a plastic guitar would feel.
HOWEVER, if you play with the NEO S laying on a table, where your hands wrap over the controller (second gif), it is excellent to play with, as it’s nearly the same as playing with a keyboard, aside from overdriving. Using the right arrow with my thumb was a bit awkward, but hey it worked great and I was able to hit those super intense charts.
Would I play pad charts with the attachment? Yes, but ONLY with the controller laid down on the table.


Fortnite Festival Pro Mode (With 5-fret Guitar Grip Attachment)
The highlighted feature of the 5-fret Guitar Grip Attachment! Pro Lead and Pro Bass on Fortnite Festival with the NEO S Fortnite Festival Edition was… fun. While I can’t say that it is the most comfortable way to play, the novelty of playing pro mode like this is worth the money. I played some ‘HOPO’ intensive tracks like The Brave and Youngblood and had pretty solid results.
The most difficult thing to do is rapid strumming. However, using the NEO S + 5-fret Guitar Grip Attachment on tap heavy songs is very fun.
This controller with attachment is really for novelty and travel play.

Brush Your Teeth, Bluetooth!
Alright, now that we’ve covered the play experience, let’s talk about why I had to play with the NEO S wired as instead of using the Bluetooth feature…
I had issues getting my NEO S to properly connect to my desktop PC. Although, I’ve never had a positive experience using Bluetooth with game controllers with any computer I’ve owned.
I also tried using the bluetooth on my Mac Mini and while it connected and worked, the controller suffered intense amounts of latency. I tried playing Friday Night Funkin’ through a browser and while it played, the latency caused me to drop many notes.While I am not blaming the controller’s Bluetooth 5.0, I will say that a 2.4ghz dongle would have been a MUCH better alternative. Thankfully, that’s what CRKD is using for their new Les Paul controller!

Pros, Cons, Final Thoughts
I feel that the NEO S is a good callback to what controllers were like during the PS2 era. Manufacturers actually experimented and I think’s what has caused modern gaming to fall short of what the 2000s were like. We don’t get funky controllers that barely function anymore. I miss it, I really do. Despite it being wasteful, it was art.With RedOctane flowing through the blood of CRKD, they are returning to that era with new-age tech that could revolutionize the gaming peripheral space for the better.

MadCatz RetroCon for PS2

Hori PS2 Katana for Onimusha 3

Keyboard Controller for Gamecube


Pros
Hall effect thumbsticks AND triggers in the same controller for under $60. (It’s $10 cheaper if you don’t want the 5-fret Guitar Grip)
Every single button on the device feels good and does not misinput (at least, not yet?)
Future proofing the controllers for potential adapters could mean… Sega Bass Fishing?
A bunch of color options for every preference.
The ability to change out thumbsticks on the fly is excellent, even if I didn’t use them.
It’s the first rhythm game controller to come out from a large company that isn’t a guitar.
It works extremely well when wired. That’s all I need. As someone who doesn’t care for wireless of any type, that was a sigh of relief.
It brings back a very nostalgic control scheme that a lot of younger millennial and older gen Z hold dear memories of.
As of this time, it has support from a company that seems like it’ll be around for a long time.
Cons
However, with many positives comes negatives.
*To be clear, this is my opinion after using the device for extended amounts of time.
No support for modern consoles. No PS5/Xbox Series? That gatekeeps a MAJOR part of the market that could’ve funneled money into CRKD.
The Bluetooth being finicky and having major latency was a major bummer and made playing in guitar grip mode difficult due to the wire being in the way.
The shape of the body is not at all ergonomic. Intense sessions will tire your hands out.
Due to the body’s shape, the paddles are a bit too easy to press when playing an intense game. Maybe that’s a skill issue, but it got annoying enough that I had to disable them altogether.
The CRKD App’s ‘reveal’ feature is extremely off putting. Applying artificial value to a gaming peripheral is a very bad thing. Good thing it doesn’t affect how the controller plays.
Now here comes the big question… Do I suggest you buy it? Yes, I do suggest it. I think that for $60, the novelty and value can’t be beat.
I have been in the rhythm game world for 20 years and have been disappointed many times. While it’s not perfect, the NEO S Fortnite Festival Edition does not disappoint.
I would like for you to know that I am an affiliate with CRKD, but that did not change the way I reviewed this controller.If you would like to buy a NEO S Fortnite Festival Edition controller yourself, you can get one here: CRKD StoreBy purchasing with that link or using the discount code 'LAUNCHABLES',you will get 5% off of your order. It will also give me some commission if that's alright with you.
Thanks for checking out my review of the NEO S Fortnite Festival Edition controller.

Want to check out the rest of my website and/or other reviews? Click the links below!